LED Blinking in Arduino UNO R3
1. What is Arduino?
Arduino is an open-source electronics prototyping platform based on flexible, easy-to-use hardware and software. It's intended for artists, designers, hobbyists and anyone interested in creating interactive objects or environments.2. What Arduino can do
Arduino can sense the environment by receiving input from a variety of sensors and can affect its surroundings by controlling lights, motors, and other actuators. The microcontroller on the board is programmed using the Arduino programming language (based on Wiring) and the Arduino development environment (based on Processing). Arduino projects can be stand-alone or they can communicate with software running on a computer (e.g. Flash, Processing, MaxMSP).3. Arduino Boards
Browse the wide range of official Arduino boards| Arduino Boards | Arduino Boards |
4. Getting Starting with Arduino
Get the latest version from the download page.When the download finishes, unzip the downloaded file. Make sure to preserve the folder structure. Double-click the folder to open it. There should be a few files and sub-folders inside.
Connect the Arduino board to your computer using the USB cable. The green power LED (labelled PWR) should go on.
5. Installing drivers for Arduino Uno
It is important to follow the steps mentioned next to be able to use the Arduino Uno and some other boards. Please check the Arduino website for up-to-date references.- Plug your board in and wait for Windows to begin the driver installation process.
- Click on the Start menu, and open Control Panel.
- In Control Panel, navigate to System and Security. Next, click on System. Once the System window is up, open Device Manager.
- Look under Ports (COM & LPT). Check the open port named Arduino UNO.
- Right-click on the Arduino UNO port and choose the Update Driver Software option.
- Next, choose the Browse my computer for driver software option.
- Finally, navigate and select the Uno's driver file, named ArduinoUNO.inf, located in the Drivers folder of the Arduino software download.
- Windows will finish the driver installation from there and everything will be fine.

6. Creating Your First Sketch in the IDE
An Arduino sketch is a set of instructions that you create to accomplish a particular task you want to achieve; in other words, a sketch is a program.For the very first project, we are going to create the LED blink sketch. We will also learn exactly how the hardware and the software for this project works as we go, learning a bit about electronics and coding in the Arduino language (which is a variant of C).
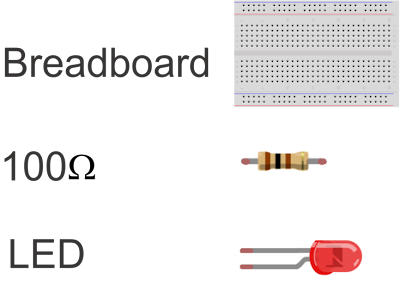
Parts Required:

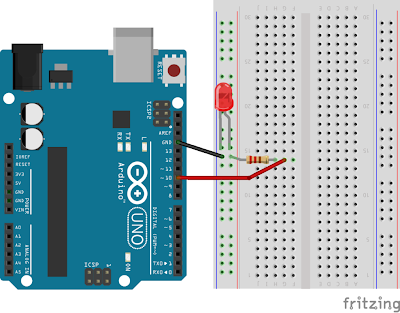
Let's see the sketch for this project, just connect the anode to GND and the Cathode to pin 10 of Arduino's board using 100ohm resistor.

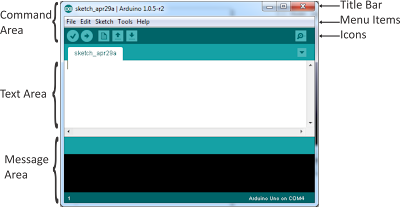
In the text area type the code:
// LED blink Flasher
int ledPin = 10;
void setup() {
   pinMode(ledPin, OUTPUT);
}
void loop() {
   digitalWrite(ledPin, HIGH);
   delay(1000);
   digitalWrite(ledPin, LOW);
   delay(1000);
}
First press verify icon to check if there are some errors, after press upload icon to run your program, if you have done all correctly, you should see the LED blinking every second.
Hiç yorum yok:
Yorum Gönder